
Context-sensitive help is available throughout the tablesONLINE/CICS software. There are three different levels of help (in the order they are accessed):
- multi-line error messages
- short explanations to assist the user when entering data or using a menu
- tutorial information
The error messages are contained in the tablesONLINE/CICSMSGS table. The System Help tables, which may be accessed and edited from the Administrator menu, contain the short explanations to assist the user. Finally, the tutorial information is contained in the Tutorial table, which may also be accessed and edited from the Administrator menu. This section describes the system help tables and how they are edited.
The entries that make up tablesONLINE/CICS help have been divided into a number of tables. Each table contains help related to a specific area of the product. For example, the ACT Help table contains all of the help related to editing the ACT table and the Menu Help table contains all of the help related to editing the menu tables.
To begin editing a system help table, you must first open the Help/Tutorial menu. To open the Help/Tutorial menu, select option 5, Edit Help Tables, from the Administrator menu (see Figure 32). This will display the Help/Tutorial menu, as shown in Figure 45. Use <PF7> and <PF8> to scroll up and down respectively.
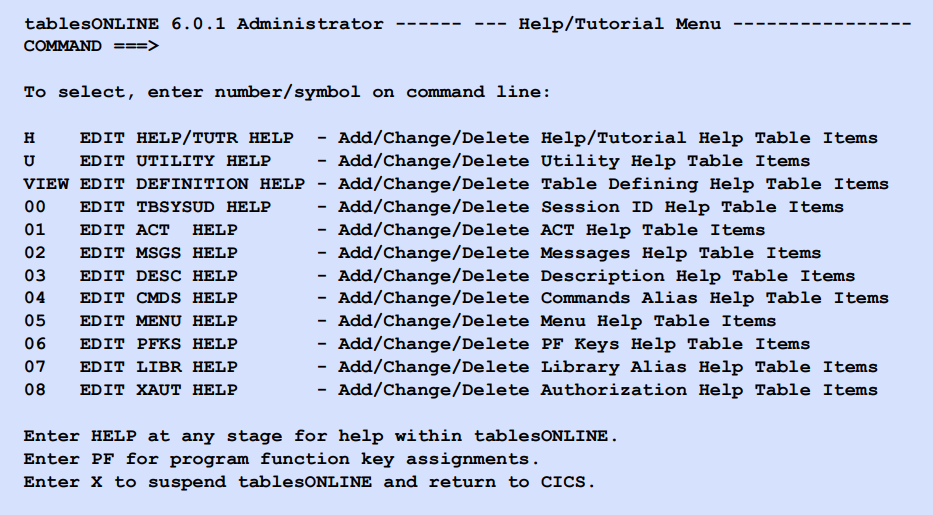
The Help/Tutorial menu contains an entry for each of the help tables. To edit a help table, insert the appropriate number or symbol on the command line and press <Enter>. This will display the Identify screen with key fields where you may insert a View name, field name and sequence number. If you wish to edit the information for a particular help entry, you can insert the appropriate row key and that row will be opened in the Edit Row screen. If these fields are left blank, the Edit Table screen is displayed. From this screen, you may select a help row to edit using one of the line commands. This will display a screen similar to Figure 46.
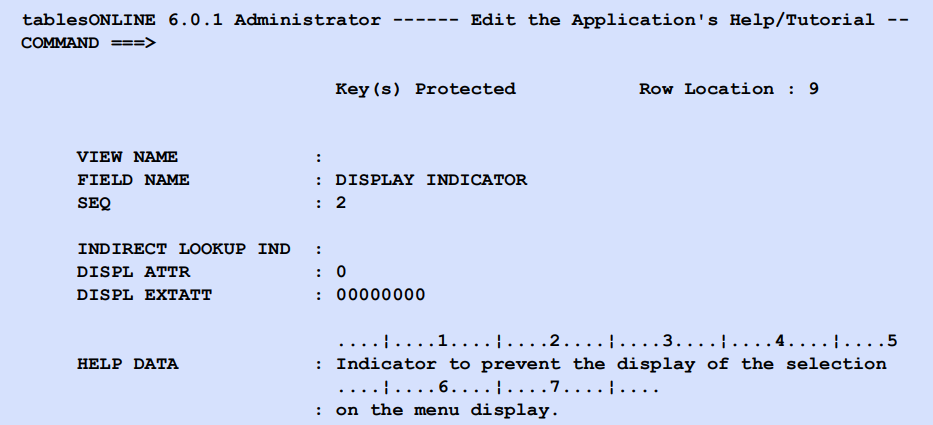
Table 38 lists the fields of the Application’s Help/Tutorial screen.
|
Field name |
Description |
|---|---|
|
VIEW NAME |
Indicates the table that the help information applies to. If this field is left blank the help entry will apply to all the tables containing the field specified in the Field Name field. |
|
FIELD NAME |
Specifies the field within that table that the help applies to. |
|
SEQ |
The Sequence of items in the help table is controlled by a key composed of the View Name and Field Name fields together with the sequence number. The sequence number allows you to create multiple lines of help text for any table field |
|
INDIRECT LOOKUP IND |
This field allows you to create help message lines that are actually retrieved from another help table or another field name in the current help table or both. |
|
DISPL ATTR DISPL EXTATT |
Display attributes and display extended attributes control the visual presentation of the data on your screen. How these features are used will depend on your installation. |
|
HELP DATA |
The Help data field contains the help message itself. This field may contain up to 79 characters of help data. Should you wish to create a help message that is longer than 79 characters, you may create multiple entries using the sequence number field. Help entries that have identical View name and field name will be displayed together in the order specified by the sequence numbers. |
If the help entry you are defining is to apply to the entire table rather than a specific field within that table, you should leave the field name blank. If the help entry you are defining is to apply to any table containing the specified field name you should leave the View name blank.
Creating an indirect help entry
To create an indirect help entry, first create a new row using the line commands. In the Application’s Help/Tutorial menu (see Figure 46) insert an I in the Indirect lookup indicator field, clear the remaining non-key fields and press <Enter>. The system displays the New Row Mode screen, as shown in Figure 47. This contains several fields, Indirect table, Indirect key—table and Indirect key—field, that are used to define an indirect help entry.
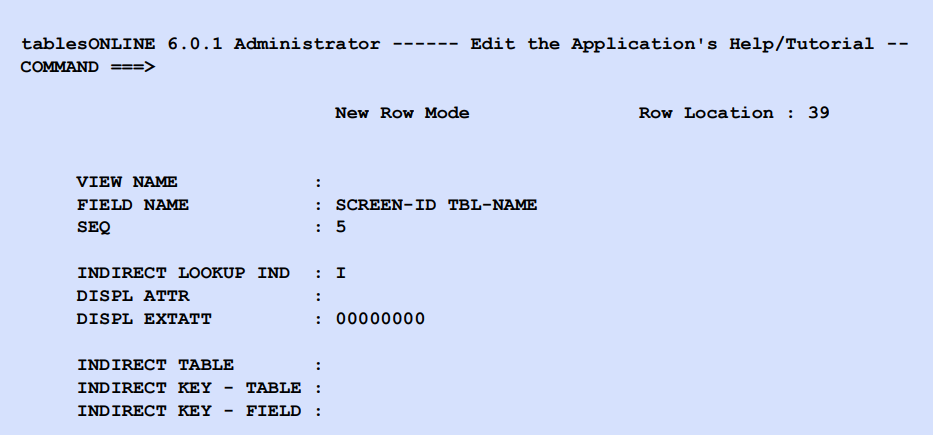
In the Indirect table field, you must specify the name of the help table from which the indirect entry is to be retrieved. The Indirect key—table field allows you to specify the View name (that is, the first key field) for the help entry to be retrieved. The Indirect key—field field allows you to specify the field name (that is, the second key field) for the help entry to be retrieved. Indirect help lookup entries can be inserted anywhere in a help table but are acted on only once. It is not possible to nest or to create a recursive loop.