
Some of the fields in this screen Figure 135 should contain information, while others may be left blank. The fields that should contain information are the Key Field Indicator, Display Length and Display Format. If these fields are left blank, default values (N for KEY INDICATOR, 1 for DISPLAY LENGTH. X for DISPLAY FORMAT) will be inserted in these fields.
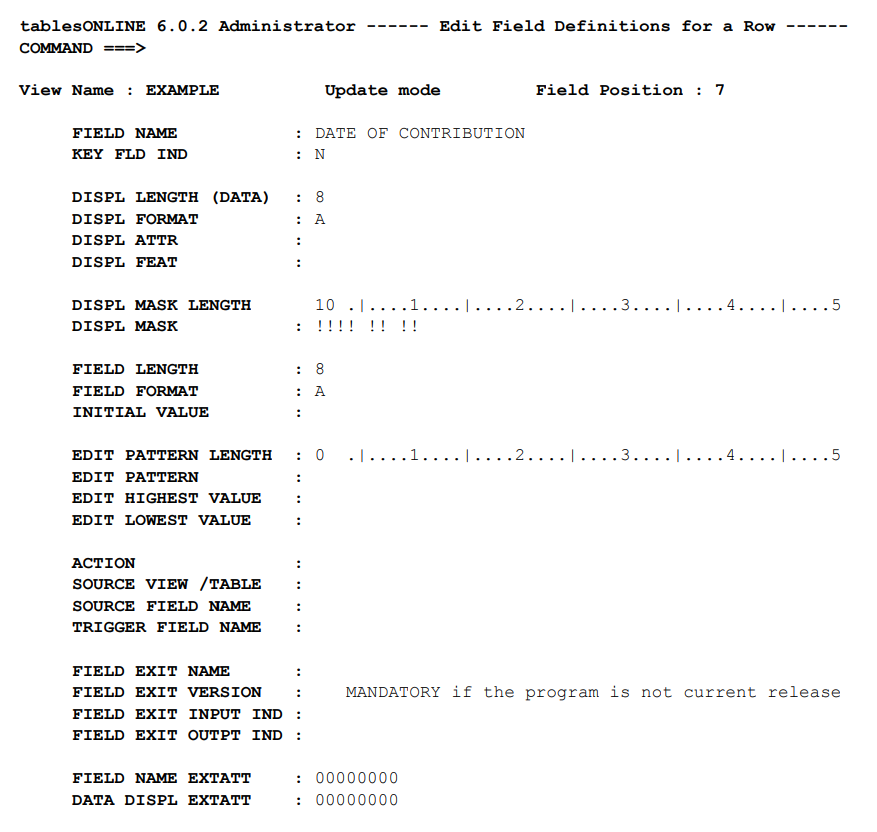
The following section describes each of the field defining items in detail. Fields must be defined one at a time. Once you have completed all of the information for a particular field, press <PF2> to save that field. Repeat this process until you have defined all fields for your table and then exit the Edit-Row screen by pressing <End>.
Field Name
This field contains the name of the table column being defined. It may be left blank, which means no name will appear as a heading for that column in the table. The field name may be up to 20 characters in length.
Key Field Indicator
The Key Field Indicator field designates whether a field is a key field and/or used as the Dynamic View Suffix. In addition, the Key Field Indicator is used in enforcing the Data Table key when using an Alternate Index (see Enforcing Unique Data Table Keys with an Alternate Index).
There are eight values for the Key Field Indicator (see Table 139). The last four are used exclusively for a View of an Alternate Index.
|
Value |
Description |
|
N or (blank) |
Indicates that the field is not a key. |
|
Y |
Indicates that the field is a key. |
|
S |
Indicates that the field is to be used as the Dynamic View Suffix. |
|
B |
Indicates that the field is both a key, and is to be used as the Dynamic View Suffix. |
|
P |
Indicates that the field is a Data Table key of a View for an Alternate Index. |
|
O |
Indicates that the field is a Data Table key and a key of the Alternate Index of a View for an Alternate Index. |
|
Q |
Indicates that the field is both a Data Table key, and is to be used as the Dynamic View Suffix of a View for an Alternate Index. |
|
A |
Indicates that the field is a Data Table key, a key of the Alternate Index, and, is to be used as the Dynamic View Suffix of a View for an Alternate Index. |
The default for the Key Field Indicator is blank (indicating that the field is not a key).
Dynamic View Suffix
In certain cases, your Data Table may be made up of a number of different types of rows. In order to indicate that one row has a different layout than another row, an identifier field must exist. This row identifier is referred to as the Dynamic View Suffix.
The identifier, which may be up to eight bytes in length, forms a suffix that will be used by tablesONLINE to overlay the rightmost portion of the View name. When the table is subsequently processed, tableBASE will examine the identifier for each row to determine which View should be used for that row. Since the identifier may be eight bytes long, it may completely override the View name.
For example, an identifier may be two bytes in length and contain the values 00 – 11, indicating 12 possible row layouts. The row identifier dynamically becomes the suffix of the View. Assume the View name is TB068A00. Prior to processing a row with a suffix of 03, tablesONLINE overlays the last two bytes of the View name and searches for a View with the name TB068A03. In order to process all 12 different row layouts, 12 Views must exist. These Views would be named TB068A00 through TB068A11. Although the rows may be mixed row types, all rows within one table must have the same row length.
Only one field may be designated as a Dynamic View Suffix within a View. As a result only one of the values S, B, Q and A may be used within a View.
Display Format / Field Format
These two formats are interrelated and determine how the data is to be displayed when editing or browsing (Display Format) and how the data is to be stored (Field Format).
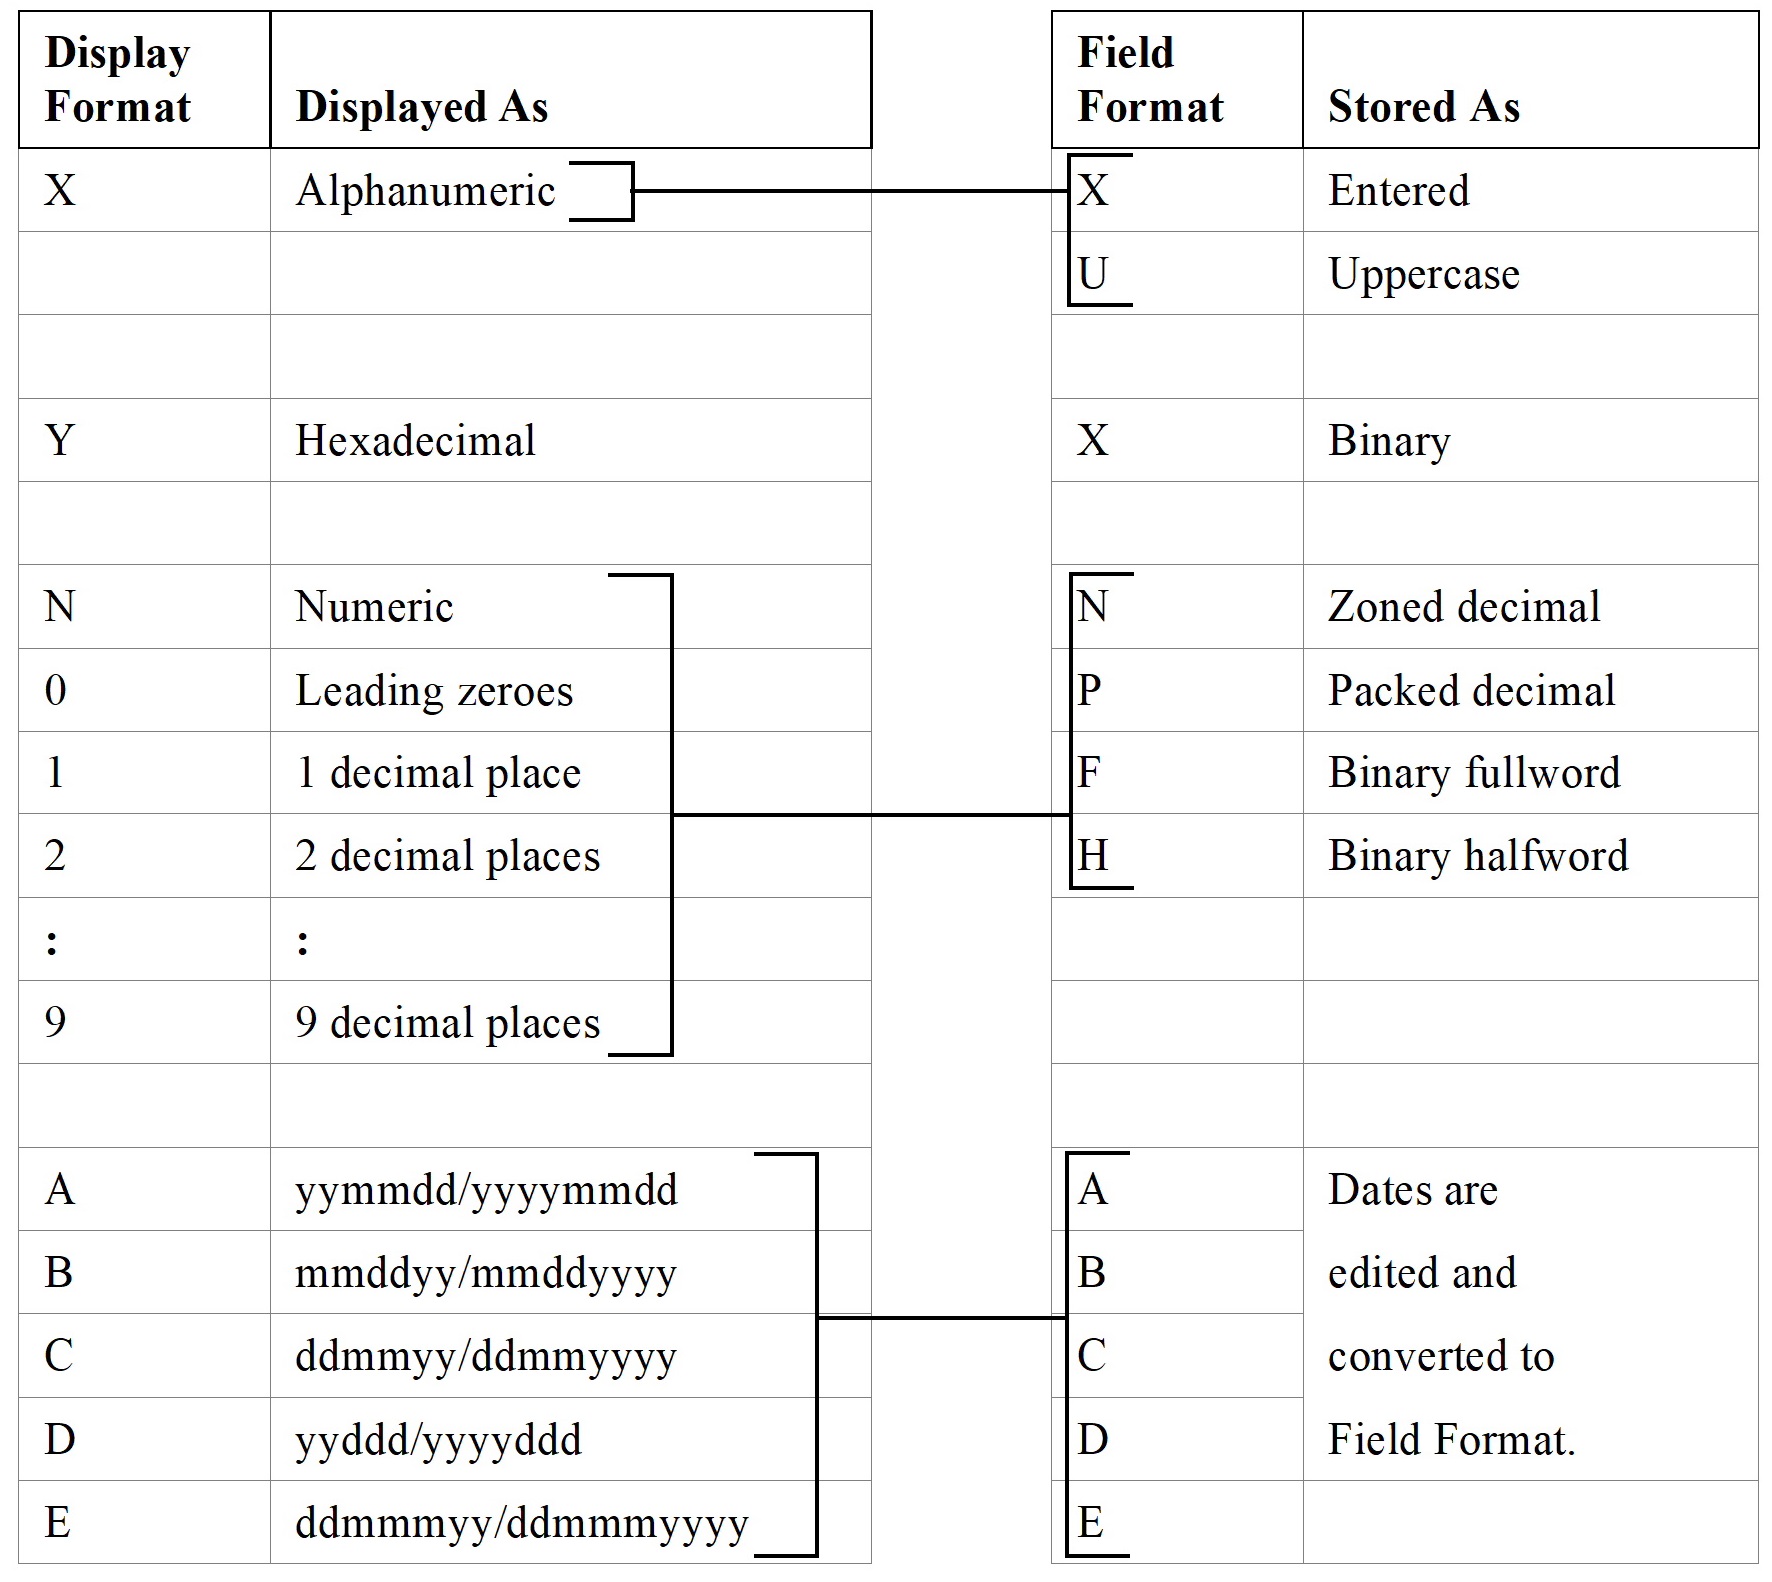
If Field Format is omitted, Table 140 indicates the default value to which it will be set.
|
Display Format Entered |
Default Field Format |
Default Rule |
|---|---|---|
|
X |
U |
Translate lowercase alphabetics to uppercase. |
|
Y |
X |
Displayed/entered hexadecimal digits into binary. |
|
N,0,1,2,…9 |
N |
Store numbers as zoned decimal. |
|
A |
A |
Store dates in format used on input; if LENGTHs are not entered, they will default to the longer lengths (for example, year represented as yyyy). |
|
B |
B |
|
|
C |
C |
|
|
D |
D |
|
|
E |
E |
If neither Display Format nor Field Format is entered, they will default to X and U, respectively.
Display Length / Field Length
The Display Length determines the length of the field on the screen when editing the Data Table. The Field Length determines the actual number of bytes that this field will occupy when stored on disk.
These two options are interrelated and dependent on the Display Format and Field Format. The relationship between the Display Length and Field Length depends on what the associated values for the Display Format and Field Format. The following figure shows the how these two options are related, as well as the minimum and maximum lengths allowed.
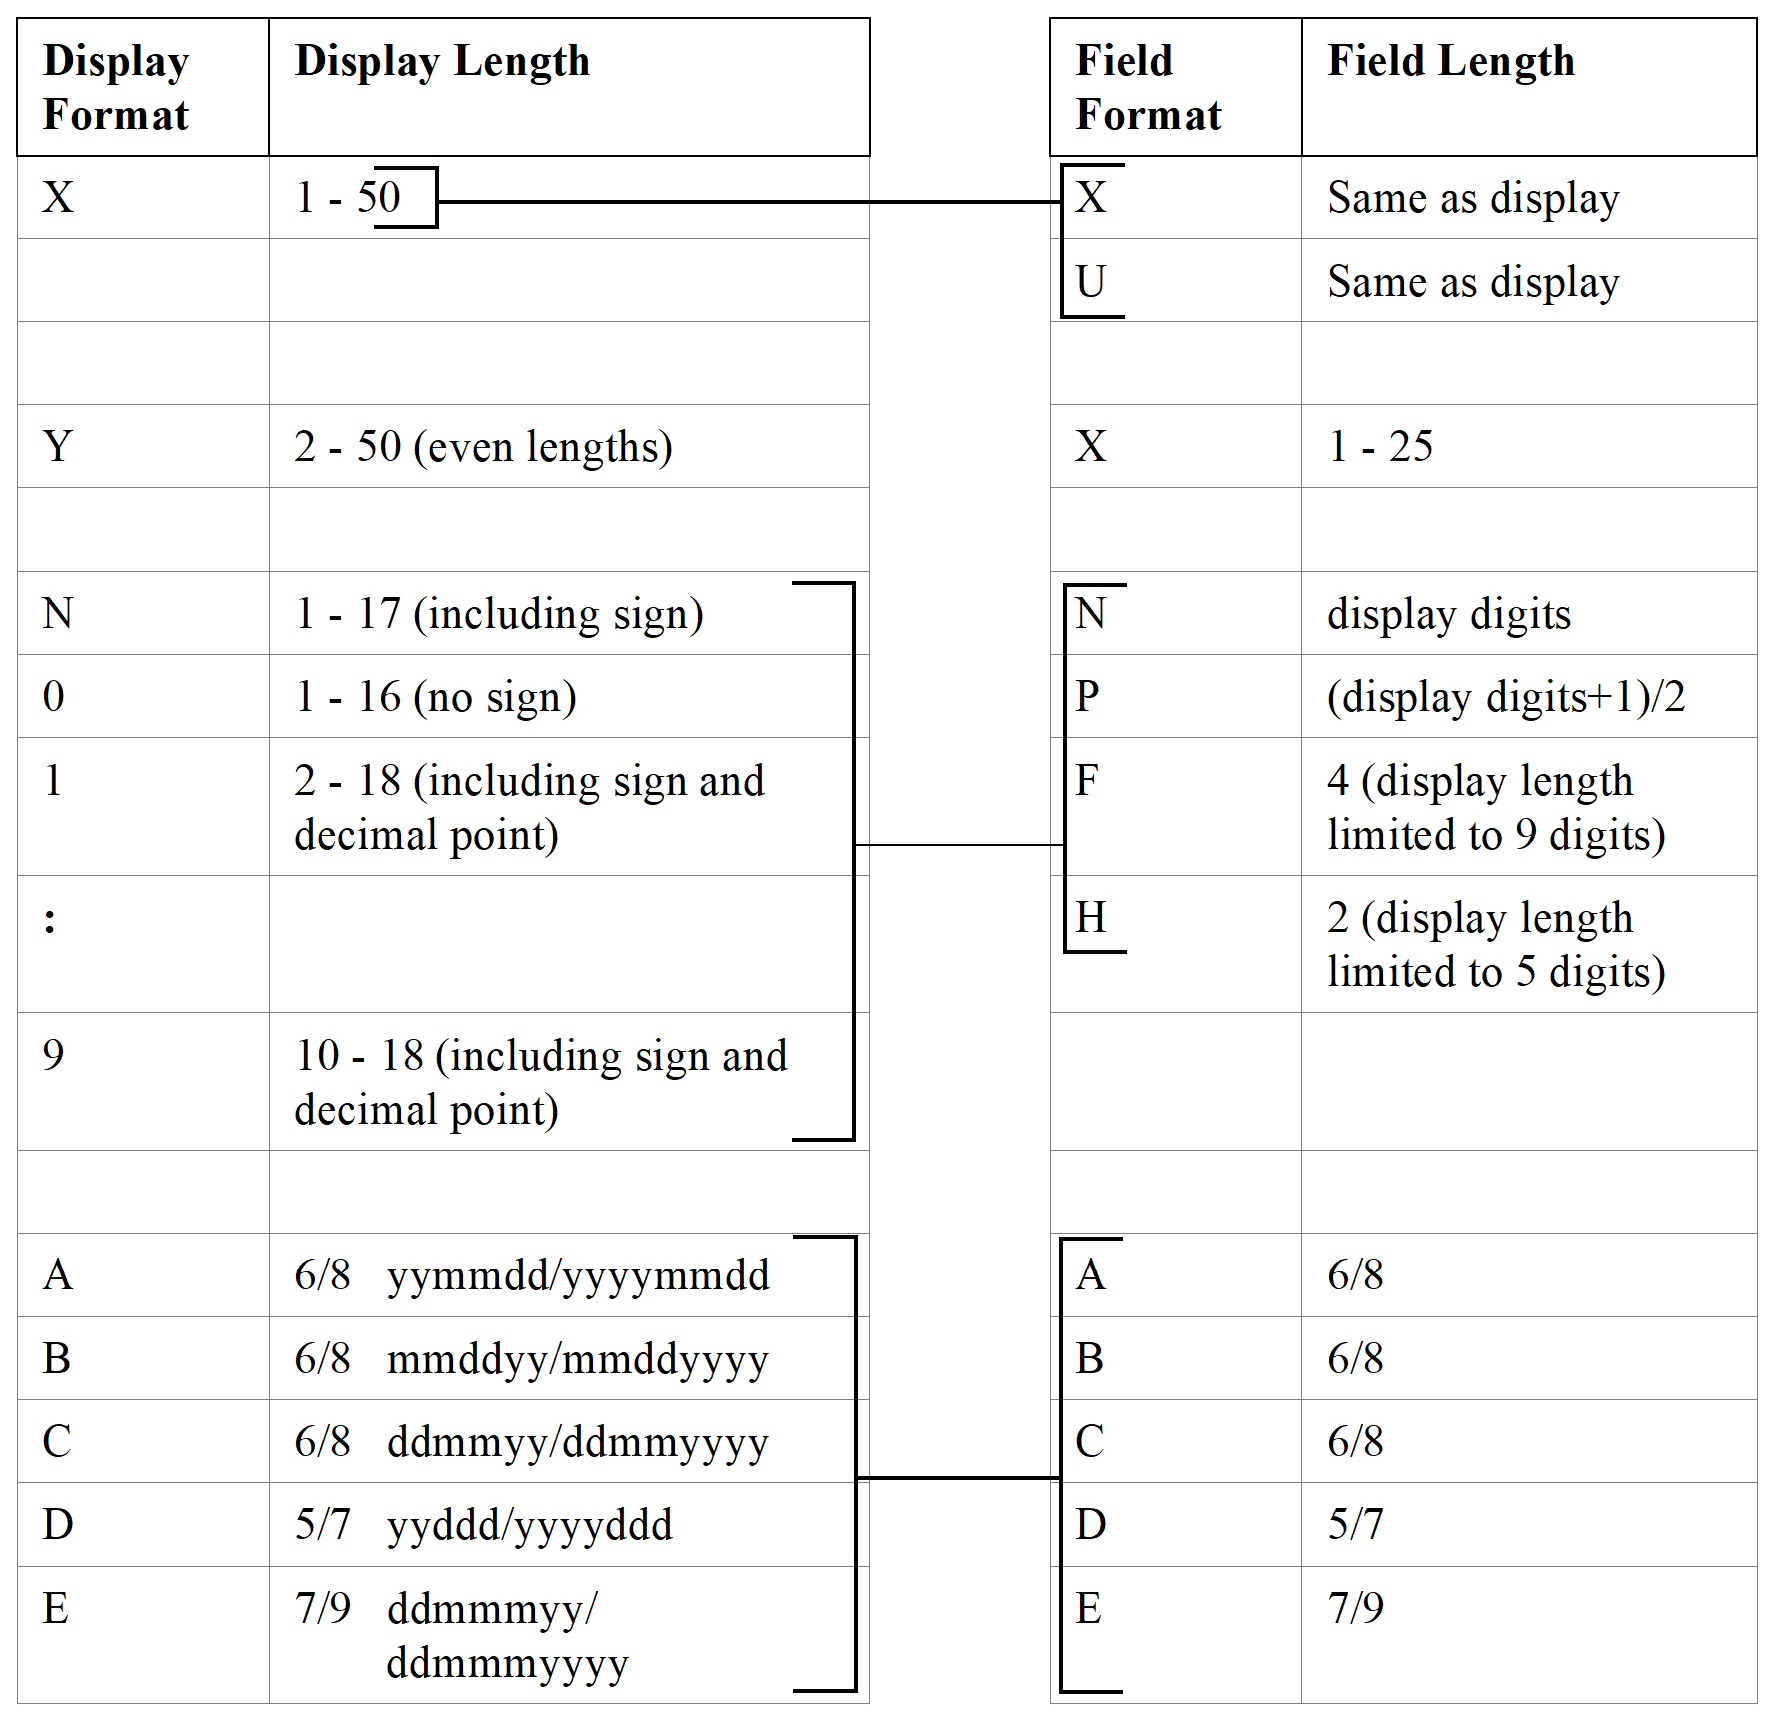
If neither Display Length nor Field Length is defined, the values of each will default to 1.
Because the Display Format is set within the View, it is possible to create different layouts of your Data Table for different users by creating multiple Views, each containing a different Display Format. It is possible, for example, to show a date to one group of users in format B, while the same date is shown to another group of users in format C.
Display Attributes
This field controls how the data from the field is to be displayed and whether user input will be accepted into the field when editing the table. The possible values are listed in Table 141:
|
Value |
Display Field Data |
Allow Edits |
Usage |
|---|---|---|---|
|
(blank) |
Yes |
Yes |
Default, normal fields. |
|
N |
No |
No |
Suppress the display of the field and headings. |
|
C |
No |
No |
Field name displayed as a comment or blank line. Data is neither stored nor displayed. |
|
F |
No |
No |
Filler field. This field will be initialized according to type. |
|
D |
No |
Yes |
Dark field for password entry, suppressed on Edit/Browse Table screen. |
|
Q |
Yes |
Yes |
Dark and Mandatory field for password entry, suppressed on Edit/Browse Table screen. Data must be entered if the row is newly created. |
|
S |
No |
No |
Suppress on Edit/Browse Table screen. |
|
P |
Yes |
No |
Protected field. Displayed on both Edit/Browse Table screen and Edit/Browse Row screen. |
|
p |
Yes |
No |
Protected field. Suppressed on the Edit/Browse Table screen and displayed on the Edit/Browse Row screen. |
|
M |
Yes |
Yes |
Mandatory field. Data must be entered if the row is newly created. Displayed on both Edit/Browse Table screen and Edit/Browse Row screen. |
|
m |
Yes |
Yes |
Mandatory field. Must be entered if the row is newly created. Suppressed on the Edit/Browse Table screen and displayed on the Edit/Browse Row screen. |
|
V |
Yes |
Yes |
Verification field. Verifies numeric data is non-zero, character data is non-blank and date fields are non-blank. Displayed on both Edit/Browse Table screen and Edit/Browse Row screen. |
|
v |
Yes |
Yes |
Verification field. Verifies numeric data is non-zero, character data is non-blank and date fields are non-blank. Suppressed on the Edit/Browse Table screen and displayed on the Edit/Browse Row screen. |
Suppressed Fields
Fields that are created with the display attribute S, p, m, or v are not displayed on the Edit/Browse Table screen used to select rows for editing but do appear on the Edit/Browse Row screen during actual editing. This feature allows application developers to simplify the display for users.
Comment Fields
The C attribute designates a field that uses no storage in the Data Table but appears on the screen during table editing. This option may be used to insert a blank line to separate groups of fields. This can be done by specifying an attribute of C and a blank field name.
Display Features
The Display Features option allows you to specify whether or not the field name is displayed, how the display is punctuated, and where data displayed as the field value comes from. The default display includes the following components:
- the field name
- a colon separator
- field data in display format
During editing or browsing of the table it may be desirable to include text in the display that is not stored on the table. This text is referred to as field-related constants or descriptive text. Valid values for display features are listed in Table 142.
|
Value |
Display Field Name |
Display Colon |
Data From |
Usage |
|---|---|---|---|---|
|
(blank) |
Yes |
Yes |
Table entry |
Default, normal display. |
|
: |
No |
Yes |
Table entry |
Display a large field on multiple lines without redisplaying field name. |
|
D |
Yes |
No |
Description Table |
Display ruler, comments, table instructions or other invariant data. |
|
Y |
Yes |
Yes |
Description Table |
Display ruler, comments, table instructions or other invariant data. |
|
N |
No |
No |
Description Table |
Display ruler, comments, table instructions or other invariant data. |
Description Text and Field-Related Constants
Description fields allow you to insert features such as a ruler line that marks character positions, or, on-screen editing instructions using Field-Related Constants.
The description text is stored and retrieved at run time by a table lookup on a description table. The display attribute should be set to C. If the display attribute is not a C, the actual field data will also appear in the field with the description data. Using this feature, allows you to display data entry instructions from the description table next to a data field. To prevent the actual data from overlaying the description text you must provide enough spaces at the beginning of the description table entry to ensure that the actual data overlays only blanks.
See Description Table Lookup Order for more information.
Display Mask
A Display Mask is a series of characters that determines how data is to be displayed. The Display Mask can be made up of any character, however, certain characters have special meaning. These special characters are referred to as delimiters and are different for fields that are defined as containing numeric or character data. The tables below illustrate the valid characters for each type of data. Display masks can be used with any display format. The number of characters represented in the Display Mask must be equal to the field length. A Display Mask of up to 50 bytes can be defined.
Numeric Data
Numeric data is filled from right to left and the decimal point is placed in the exact location specified in the Display Mask. The delimiters are replaced by numbers or leading blanks. Any characters introduced by the mask, such as separating commas, are suppressed if they are preceded by leading blanks in the data. The only exception to this occurs when the edit character is a decimal point and the absolute value to be displayed is less than 1. For example, .0123.
Table 143 identifies and describes the Special Delimiters for Numeric Fields
|
Delimiters |
Meaning |
|---|---|
|
. |
Decimal Point. Inserts a decimal point at the location in the mask. For formats 1-9 the decimal must appear in the correct location in the mask. For N and 0 it can be placed anywhere in the number since it does not actually represent a decimal point in these cases. Formats are described in the section Display Format / Field Format. |
|
+ or – |
A + or – can occur either in the leading or trailing mask areas. A leading plus sign causes both negative and positive data values to be identified by either a plus sign or minus sign as appropriate. A trailing minus sign causes only negative data values to be identified with a minus sign. A leading minus sign causes only negative data values to be identified with a minus sign. A trailing plus sign indicates that both negative and positive numbers are displayed with a trailing sign. |
|
DB or CR |
This symbol in a trailing position indicates that a negative number is displayed with a trailing blank and either DB (for debit) or CR (for credit). |
|
( ) |
Parentheses placed around the number causes negative data values in the field to be enclosed in parentheses. |
|
! |
Exclamation mark. Identifies an open position in the mask where tablesONLINE places field data. As data is entered into the field, each character replaces one of the exclamation marks until they have all been replaced. |
|
Other |
Any other character is inserted exactly as shown in the mask into the display of the data value. |
If a numeric field (Display Format N) contains 3456789, Table 144 shows what would be displayed with several different Display Masks.
|
Display Mask |
Produces |
|---|---|
!,!!!,!!!.!!+
|
34,567.89+
|
Model: -!!!!!-!!.!!
|
Model: 345-67.89
|
Dfl -!.!!!.!!!,!!
|
Dfl 34.567,89
|
|
Display Mask For a negative value |
( 34,567.89)
|
Character Data
Character data is filled from left to right. The delimiters are replaced by alphanumeric characters or trailing blanks (see Table 145).
|
Delimiters |
Meaning |
|---|---|
|
! |
Exclamation mark. Identifies an open position in the mask where tablesONLINE places field data. As data is entered into the field, each character replaces one of the exclamation marks until they have all been replaced. |
|
Other |
Any other character is inserted, exactly as shown in the mask, into the display of the data value. |
If a 10 character alphanumeric field contains ABCD1234, Table 146 shows what would be displayed with several different Display Masks.
|
Display Mask |
Produces |
|---|---|
!!!,!!!.!!!!
|
ABC,D12.34
|
MODEL: !!!!-!!.!!!!
|
MODEL: ABCD-12.34
|
Type !!!! Rev: !!/!!/!!
|
Type ABCD Rev: 12/34/
|
!!!! FLAGS !!/!!/!! OFF
|
ABCD FLAGS 12/34/ OFF
|
When entering data in a field that uses a Display Mask, you have the option of clearing the field using the <EOF> erase key and entering the data characters only, or, you can enter the data directly in the spaces indicated by the mask.
Initial Value
The Initial Value field allows you to set a default value for the field. When a new row is created using the INSERT command or the I line command in the Edit-Table screen (see Figure 134), the Initial Value will appear in the field. If a Display Mask is specified then the initial value will appear as specified by the Display Mask. For example, an Initial Value of 10 with a Display Mask of $!!!.!!- will appear as an initial value of $ 10.00.
The initial value must conform to the Edit Pattern, Display Format, Edit Highest Value and Edit Lowest Value, if these values are defined.
While creating a new row on the Edit-Table screen (see Figure 134), the Initial Value can be overridden by typing over or clearing the entry unless the field is protected. To protect the field, enter P in the Display Attribute field.
Edit Pattern
The Edit Pattern field is used to specify an edit pattern for data entry. This edit pattern is used to validate the data. Pattern validation can only be used for fields with a display format of X. The pattern length must match the field display length. In order for input data to be accepted, it must match the validation symbols specified for the field. Table 147 is a list of the acceptable edit pattern validation symbols.
|
Validation Symbols |
Characters Represented |
|---|---|
|
Z |
Alphabetic (A – Z or a-z) |
|
A |
Alphabetic (A – Z or a-z) or blank |
|
9 |
Numeric (0 – 9) |
|
I |
Numeric (0 – 9) or blank |
|
Y |
Alphabetic (A – Z or a-z) or numeric (0 – 9) |
|
X |
Alphabetic (A – Z or a-z) or numeric (0 – 9) or blank |
|
B |
Blank |
|
C |
Any character (no validation) |
|
Literals |
A set of characters surrounded by exclamation marks (!) |
|
! |
This is a delimiter. Characters between the delimiters must be present in the field. |
The following examples of edit patterns illustrate the use of this facility.
ZZ!-!9999 – this pattern verifies that the first two characters are alphabetic, the third character is a hyphen and the last four characters are numeric.
!AB!-I99-!ZZ! – this pattern verifies that the first two characters are AB, the third character must not be a numeric or blank, the fourth and fifth characters are numeric and the last two characters are anything other than ZZ.
Edit Highest Value / Edit Lowest Value
The Edit Highest Value and Edit Lowest Value fields allow you to constrain the value of the field within an upper and lower bound. The values entered must conform to the Edit Pattern and Display Format, if these values are defined.
The value set in the Edit Highest Value field must be greater than or equal to the value set in the Edit Lowest Value field. For example, if the lowest value is -100 then the highest value could be -90, -10, or 100 but cannot be -220.
The Edit Highest Value and Edit Lowest Value fields must be used together, that is, both set or both left blank.
While creating a new row on the Edit-Row screen, the user will receive an error message if a value outside the bounds of those set in the Edit Highest Value and Edit Lowest Value fields is entered.
Action Codes
This is a multi-purpose field. It may be used to specify:
- existence, exclusion or range validation
- importation of data from external tables
- automatic date updating
- insertion of user ID of the last person who modified a row
It is used in conjunction with the three fields that follow: the Source Table, Source Field, and Trigger Field Names. The valid action codes are listed in Table 148, together with the requirements for the other three fields:
|
Action Code |
Action Performed |
Source Table |
Source Field |
Trigger Field |
|---|---|---|---|---|
|
Y |
Existence check – accept only if entered value matches comparison value. When editing the field, a list of all available rows on the Source Table can be produced by pressing <PF1> for help. |
Yes* |
Optional |
No |
|
N |
Exclusion check – accept only if entered value does not match comparison value. |
Yes* |
Optional |
No |
|
R |
Range check – accept only if entered value falls within the range of comparison values |
Yes* |
Optional |
No |
|
E |
Effective value retrieval – same as a range check, however, lower limit of range is taken from previous row in table. |
Yes* |
Optional |
No |
|
I |
Data importation – import data from another source triggered by successful Y, R, E. |
Yes* |
Yes |
Yes |
|
D |
Duplicate value – duplicate the data into this field whenever the value changes in the source field. |
No |
Yes |
No |
|
C |
Creation date – put current date into this field only when the data row is created. This code may be used only once in a table. This MUST be a date field. |
No |
No |
No |
|
U |
Update date – put current date into this field whenever any field in the data row is changed. This code may be used only once in a table. This MUST be a date field. |
No |
No |
No |
|
B |
Insert UserID – put the UserID of the user currently editing the table into this field if the row is modified (last UserID). Use this code only once in a table. Procedure:
Whenever a row in the table is updated the UserID of the person updating the table will be placed in the field for that row. |
No |
No |
No |
Table 149 lists the action codes that when assigned to a table or library field will display the described list when HELP is pressed for that field.
|
Action Code |
Action Performed |
Source Table |
Source Field |
Trigger Field |
|---|---|---|---|---|
|
L |
List libraries – produces a list of authorized libraries from the TBOLLIBR table. Both the DDNAME and the Dataset names are listed. If the field is defined to be 44 bytes in length, the Dataset Name will be returned. If the field is defined to be 8 bytes in length, the DDNAME will be returned. |
n/a |
n/a |
n/a |
|
V |
List Views – produces a list of all authorized Views. |
n/a |
n/a |
n/a |
|
T |
List Tables – produces a list of all authorized tables or alternate indexes. |
n/a |
n/a |
n/a |
Existence Check (Y)
Verify that the value entered in this field exists as a key on the table specified as the Source Table. If the key value is present on the Source Table, the field data will be accepted. When this action is used, it is possible to display a list of the rows from the Source Table by pressing <PF1> for help.
Exclusion Check (N)
Verify that the value entered in this field does not exist on the table specified as the Source Table. If the value is not present on the Source Table, the field data will be accepted.
Range Check (R)
Verify that the value entered in this field lies within one of the ranges on the Source Table. The ranges consist of pairs of lower and upper limits. The value entered is accepted if it is greater than, or equal to, the lower limit and less than, or equal to, the upper limit. Range checking with numeric fields may be performed only for positive ranges.
The comparison ranges are specified in two consecutive fields of the Source Table (see Table 150). The first of the pair, the lower limit, is the key, and the second, displayed to the right, is the upper limit.
|
Lower Limit (Key) |
Upper Limit |
|---|---|
|
5000 |
6000 |
|
3000 |
4000 |
|
1000 |
2000 |
In addition, the following rules must be observed for the Source Table. The lower limit, the upper limit and the field being validated must have the same length and format, and the Source Table (or Alternate Index) must have a descending organization.
You may perform a simple range check that consists of only one range. In this case, data must fall within that range in order to be accepted. For this type of range check, the Source Table will contain only one entry.
You may also specify single ended boundaries for the range. A single-ended boundary may specify that a value must be greater than, or equal to, a lower limit with no upper limit or that a value must be less than, or equal to, an upper limit with no lower limit. In order to set a single-ended boundary use the following:
Lower Limit – with no upper limit
The value entered must be greater than or equal to XXX. Specify XXX as the lower limit (key) in the Source Table and specify zero as the upper limit.
Upper Limit – with no lower limit
The value entered must be less than or equal to XXX. Specify XXX as both the lower and upper limit in the Source Table.
Effective Value Retrieval (E)
Effective value retrieval is a type of range checking. It presumes that the upper limit of one range is the lower limit of the next range. There is, therefore, no need for the upper limit field. Range selection with numeric fields can only be performed for positive ranges.
The primary purpose for this type of table is the Data Importation action described below.
The value entered determines which range is selected. A range is selected if it is greater than, or equal to, the lower limit (the key on the Source Table) and less than the next higher key, the upper limit.
In addition, the following rules must be observed for the Source Table. The lower limit (the key on the Source Table) and the field being validated must have the same length and format, and the Source Table that lists the acceptable ranges (or Alternate Index) must have a descending organization.
Data Importation (I)
Data Importation specifies a field into which data is imported when a Y, R or E action is successful in a previous field. The value to be imported is identified as follows:
- Both a Source Table name and an import Source Field name must be specified.
- A trigger field name must also be specified. The Trigger Field is a field in the View with an action of Y, R or E. The length and format of the Trigger Field must match the key of the Source Table.
When a value entered in a Trigger Field is accepted, a row is retrieved from the Source Table using the entered value as the key. The imported data value is taken from the source field of the retrieved row in the Source Table.
Duplicate Value (D)
When this action code is specified for a field, the value in the field is copied from a source field in the same table row. The value in the field is automatically duplicated whenever the source field value is changed. The length and format of the source field must match the field being specified as a duplicate. In order to perform this function the Source Table Name column must be blank.
This action code can be used in situations where it is necessary for users to view a table using two different keys. Suppose that the table contains the following fields,
- State
- City
- Street Name
THEN:
- User1 wishes to view the table with the key “City/Street Name”
- User2 wishes to view the table with the key “Street Name/City”
Using the Data Duplication action code you can define a duplicate of the City field that follows the Street Name field in the table. The result is the following fields in your table: State, City, Street Name, City.
When the Views are created for each user, one of the City fields is suppressed in each case and the key is defined using the remaining City and Population fields. This results in:
- Key 1 – City/Street Name
- Key 2 -Street Name/City
Both users are actually viewing the same data through their own custom View, but only one copy of the data must be maintained since the duplicate is updated automatically when the source field is modified. Remember, keys need to be contiguous data fields.
Creation Date (C)
This causes a date field to receive the operating system’s current date when a row is first created. A date field with this action is protected from update by the user. The Creation Date code may only be used once in a table.
Update Date (U)
This causes a date field to receive the operating system’s current date when the row is updated. A date field with this action is updated automatically by the program and is protected from update by the user. The Update Date code may only be used once in a table.
Source View/Table
The name of the View/Table entered here will be used for action codes Y, N, R, E and I. This field must be left blank when the action code is D, C or U.
The edit action codes Y, N, R and I are usually performed with reference to a View. If a corresponding View is not available for the source View/table, the source field name is left blank. This indicates that tablesONLINE accesses the Data Table or Alternate Index directly. In this case, the key of the Source Table must be the same size and format as the current field and data importation is not possible from that particular Source Table.
Source Field Name
The Source Field name identifies a field within the Source Table that is used to validate data or as the source of import, depending on the action code specified (Y, N, R, E, D or I). This field must be the entire key field of the Source Table for actions Y, N, R and E. If a name is entered here, it indicates that a View for the Source Table will exist at table edit time.
Trigger Field Name
The Trigger Field name is required when Data Importation (I) is specified. The field name entered may be any field of the current View that has an action code of Y, R or E.
Field Exit Name
Together with the Field Exit Version, Field Exit Input Indicator and Field Exit Output Indicator, this field controls the calling of a user exit program from the tablesONLINE editor. See the chapter on tablesONLINE/CICS Exit Programming in the tableBASE Programming Guide for information on the design and use of exit programs.
This field allows you to specify the name of the exit program to be called by tablesONLINE.
Field Exit Version
This option is for backward compatibility and allows you to indicate whether the exit program specified was compiled with a particular tableBASE release.
- Enter 4 to indicate the exit program was compiled with copybooks provided with Release 4
- Enter 5 to indicate the exit program was compiled with copybooks provided with Release 5.0.x
- Enter 6 to indicate the exit program was compiled with copybooks provided with releases 5.1 or later
Field Exit Input Indicator / Field Exit Output Indicator
The indicator fields tell tablesONLINE when to call the exit program. The valid values for these indicator fields are listed in Table 151.
|
Value |
Exit Program Called |
|---|---|
|
(blank) |
Not called |
|
B |
Before the action |
|
A |
After the action |
|
Y |
Both before and after the action |
For example, when the editor is getting data for display, if the exit input indicator is set to B for a field, then the corresponding exit program will be called before data is taken from the row.
If this indicator is set to A, the exit program is called after the data is taken from the row and converted ready for display. A decision about whether or not to display the data can be made within the exit program.
Exit processing based on field accesses as described above is one of the most powerful features of tablesONLINE. Exits are also provided at the row level and the table level, making it possible to invoke an exit program when the table is opened or each time a row is retrieved. Row and table level exit information is provided in the Supplementary View discussed later in this chapter.
Data Display Extended Attributes / Field Name Extended Attributes
The two EXTATT fields define the extended attributes to be used for special effects when the associated fields are displayed. Data Display EXTATT controls display of data from the field being defined, while Field Name EXTATT applies to the field name when it is displayed, as a column heading in a select row screen. This allows users with 3270-series color terminals to control the colors and allows any user to control features such as blinking or reverse video display.
The User Profile (for additional information see, Edit Profile) also contains the Row Data EXTATT and Field Name EXTATT fields. If non-zero data is present, the field-specific extended attribute information from the View overrides the User Profile extended attributes.
Extended attribute usage is highly system dependent. What can be done with this field will depend both on what your terminal can accommodate and on how the local CICS installation’s attribute handling has been set up. All the extended attribute fields are initialized to low values that do not affect standard displays.
Due to the system-dependent nature of these codes, tablesONLINE itself does not perform any error-checking on them.