
The supervisor asked that a table be set up that contains the charitable contribution of each employee. Each month:
- the employee with the highest charitable contribution receives a calculator, and
- the department with the highest charitable contribution receives a free lunch.
In the following exercise, a table showing the charitable contributions of ABC employee will be created.
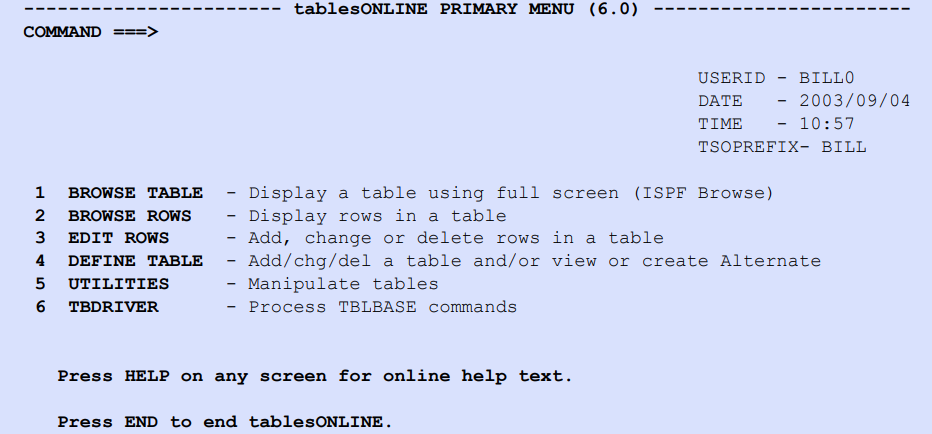
Invoke tablesONLINE/ISPF
Define a Table Called EXAMPLE
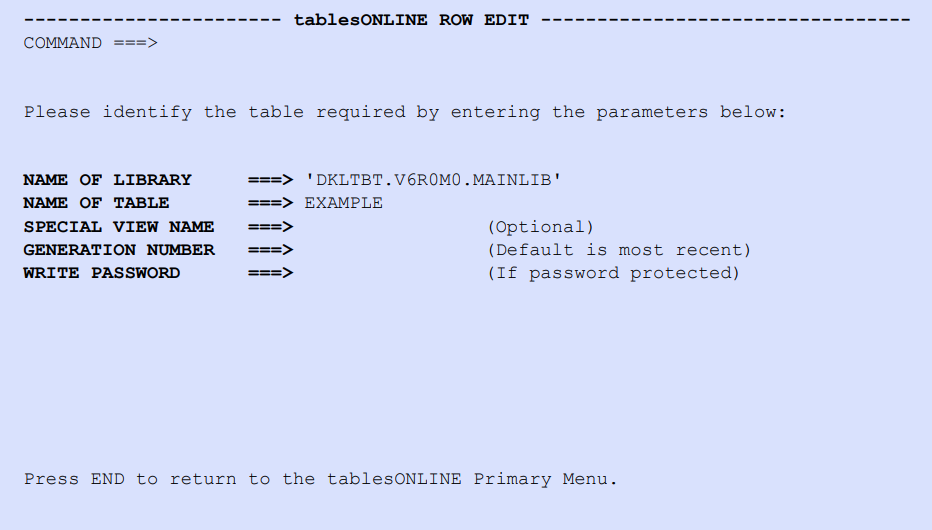
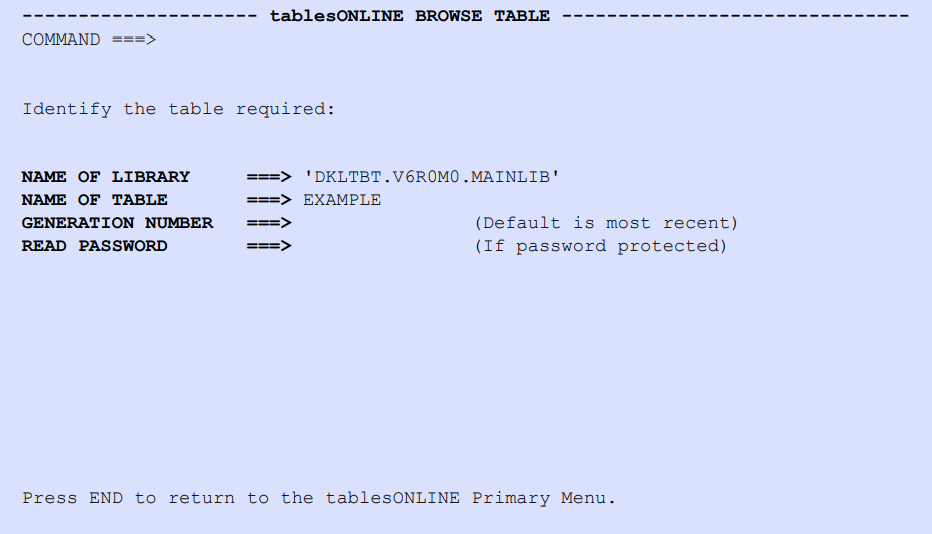
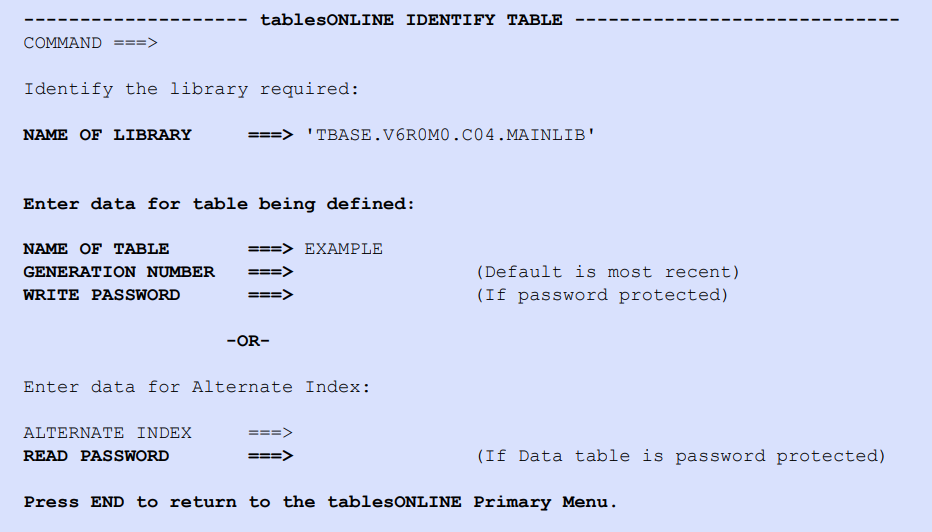
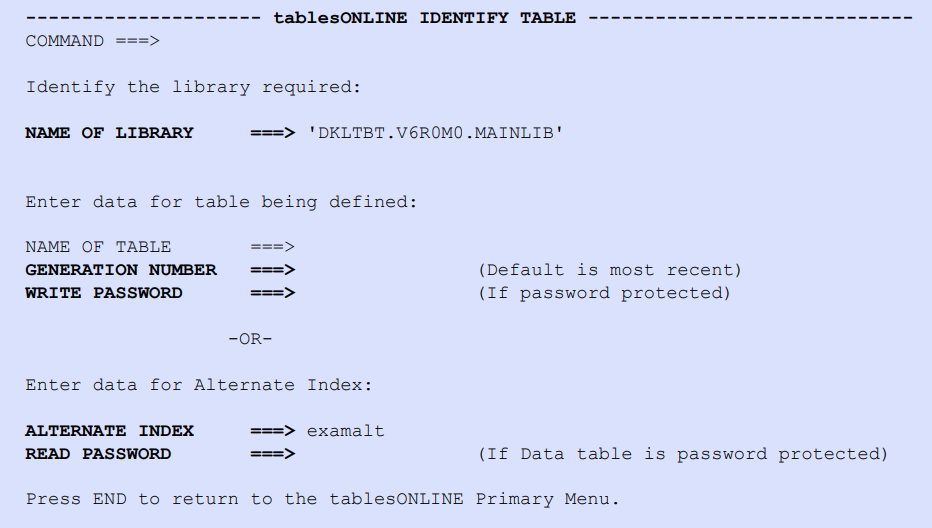
Choose Option 4 – DDEFINE TABLE and press <Enter>. Assume that the library in which the table is to reside has already been defined. The tablesONLINE IDENTIFY TABLE screen appears, as illustrated in Figure 222.
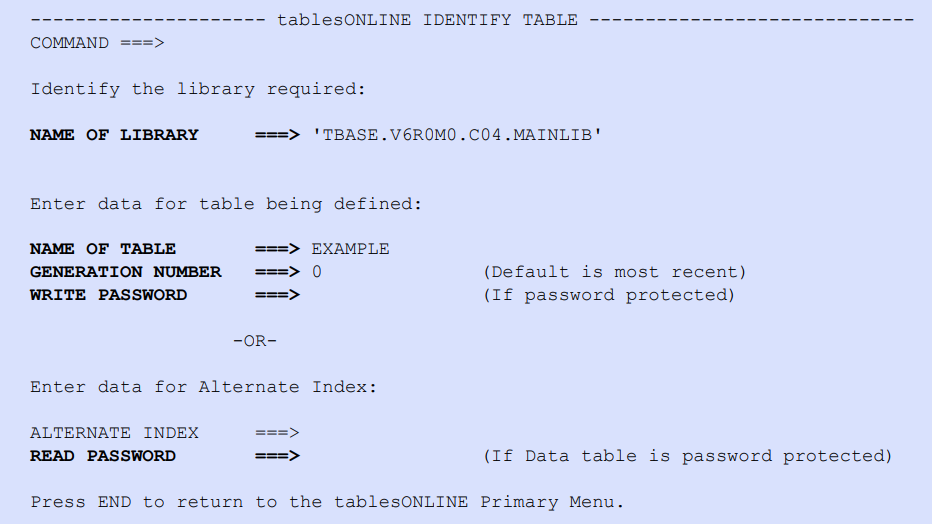
This screen appears with the names of the table and library that were manipulated in the previous tablesONLINE session.
In the Name of Library field, specify a library that already exists. Use the library, ‘YOUR. PREFIX.TBASE.MAINLIB’ that is distributed with the tablesONLINE package.
Name the table EXAMPLE by typing this name in the Name of Table field.
To put the table in a new library, the library has to be defined before specifying it there.
The Generation and Password fields apply only to existing tables, not to ones that have not been defined yet. Leave these fields blank.
When <Enter> is pressed, the tablesONLINE DEFINE TABLE screen appears, as shown in Figure 223.
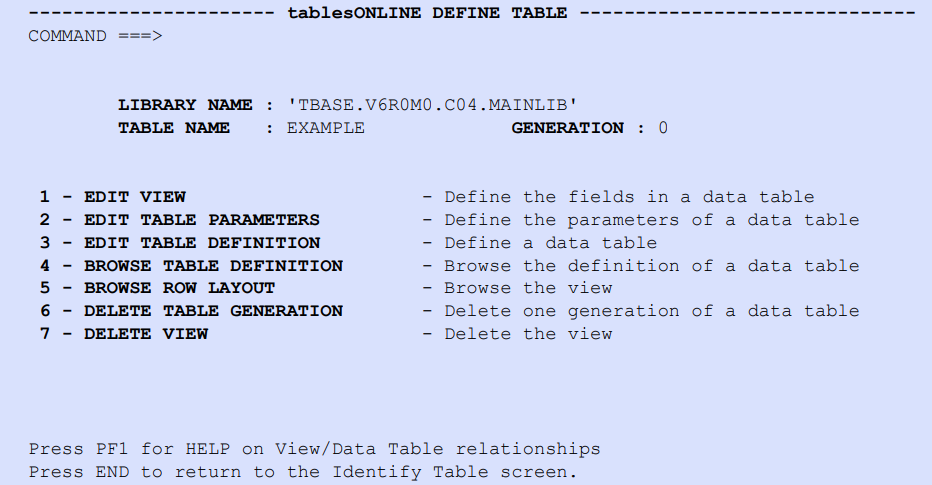
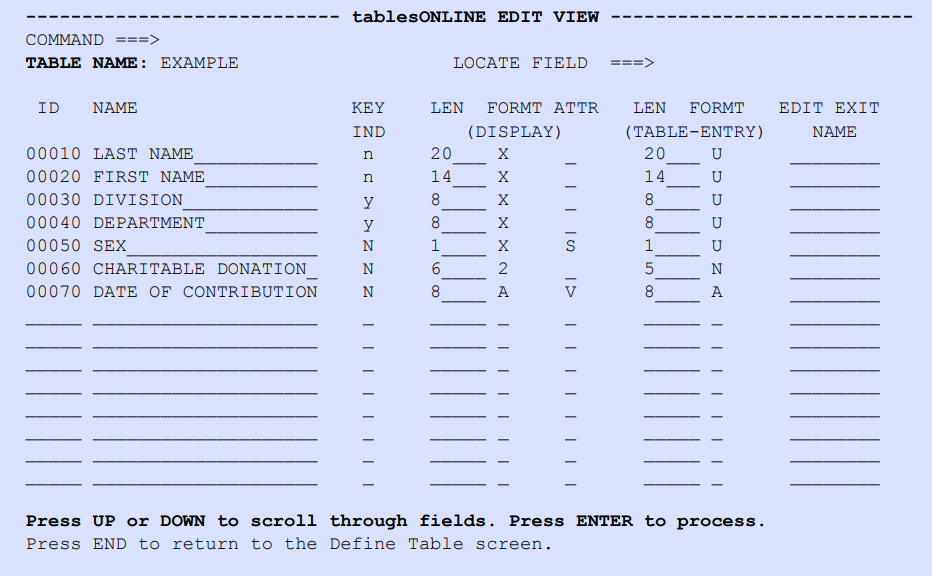
This screen contains the options to define the table. It is better to perform these options in sequence because tablesONLINE calculates the Key Location, Key Length, and Row Size fields from values specified in previous options. Choose Option 1 – EDIT VIEW.
Define Fields in EXAMPLE
To provide the information that the supervisor requested, the table should contain the following data for each ABC employee:
- name
- department
- division
- charitable contribution
- date of the contribution
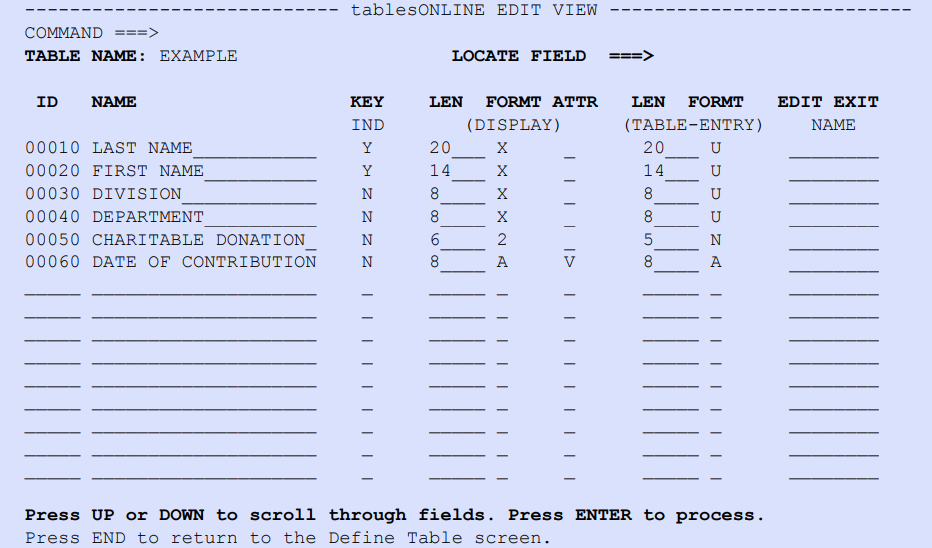
The first step is to list the field names in the Name column.
Type Last Name, First Name, Division, Department, Charitable Contribution, and Date of Contribution.
To order your rows, type numbers in the ID column, as shown in Figure 224.
Specify Y in the Key Ind field for the Last Name and First Name fields, so that the table is ordered alphabetically by employee name. For the other fields, specify N.
Specify in the Length (Display) field the number of characters of each field when it is displayed. Note that donation will be displayed as a money field.
Since the date is in the format YYYYMMDD, specify a length of 8 for the Date of Contribution field because the date is always eight characters.
Specify that the format of the fields when displayed is X (text). The format of the date is A which specifies that it appears in the order of year, month, and day.
Press <Enter> when finished to make the defaults for the other fields appear. Leave the Edit Exit Name field blank an exit program. is not being invoked.
Press <Enter> to process the information and press <PF3> (END) to return to the tablesONLINE DEFINE TABLE screen (see Figure 223) where Option 2 – EDIT TABLE PARAMETERS was selected to define the parameters of the table.
Edit EXAMPLE Parameters
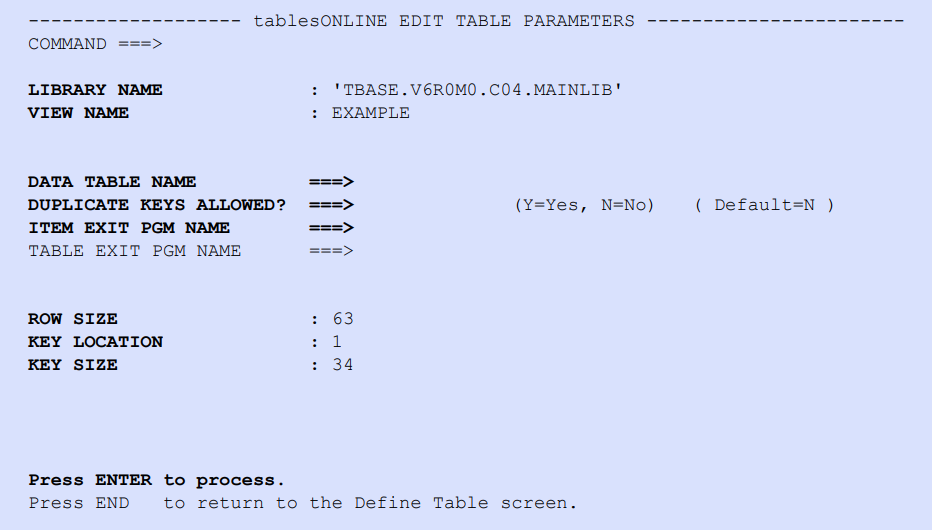
The screen appears with the View Name and Library Name fields filled in. tablesONLINE generates he View name from the name of the table that was specified in the tablesONLINE IDENTIFY TABLE screen (see Figure 222), so it doesn’t need to be specified. The Data Table Name field applies only if the View being defined is for a different view of a table. Since the default View name is being used, leave this field blank.
Specify N (No) in the Duplicate Keys Indicator field so that the table does not have rows with identical keys. Because N is selected, the Duplicate Keys Indicator field does not appear on the tablesONLINE IDENTIFY ROW screen (see Figure 233). If Y (Yes) is selected, the Duplicate Keys Indicator field does appear.
Leave the Item Exit Pgm Name and Table Exit Pgm Name fields blank. An exit program is not being invoked.
The last three fields are values that tablesONLINE calculates from the values entered on the tablesONLINE EDIT VIEW screen (see Figure 224). These values cannot be changed.
Press <Enter> and then press <PF3> (END) to return to the tablesONLINE DEFINE TABLE screen (see Figure 223) and select Option 3 – EDIT TABLE DEFINITIONS to define general characteristics of the table. The tablesONLINE EDIT TABLE DEFINITION screen appears, as illustrated in Figure 226.

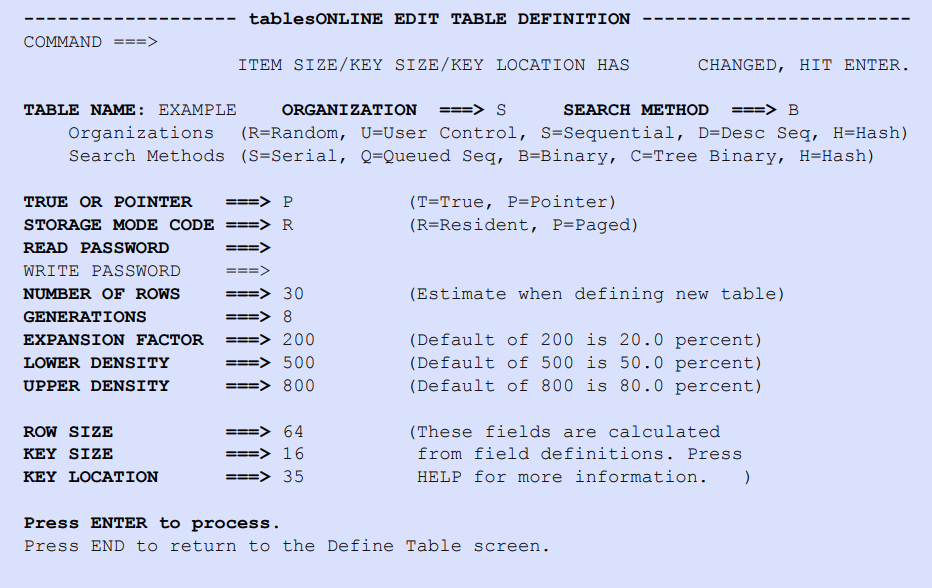
Define General Characteristics for EXAMPLE
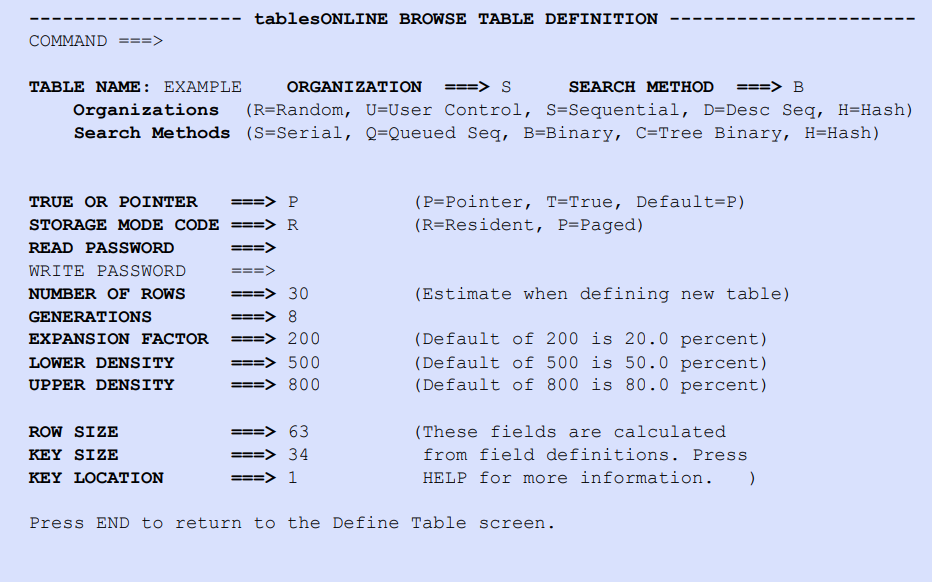
This screen appears with the name of the table that is being defined in the Table Name field. If the table does not exist, tablesONLINE fills in default values for all the fields and a message is displayed, prompting the operator to press <Enter>.
In the Organization field, change the R (Random) to S (Sequential) so that the rows in the table are ordered in ascending order, not in the order they are added to the table. Now the table will be ordered alphabetically by employee names.
Change the Search Method field value to B (Binary), because S (Serial) search is usually less efficient for Sequential tables.
Since Pointer tables are the default leave this in the useful for large tables and your table is small, leave the T (True) default in the Organization field.
Leave the password fields blank because it is not a requirement (for this exercise) to specify a password is to look at or to update the table.
The Number of Rows field serves two purposes.
- When a table is being defined, this field allocates space for the table. The value specified in this field is used by tableBASE to initially allocate space for the table.
- After the table is defined, the Number of Rows field contains the number of rows in the table. If the table has no rows, then this field is blank.
Specify 40 in this field because the company used in this exercise has 25 employees, allowing some space for future expansion.
Specify 8 in the Generation field. Up to nine generations of a table are kept.
Leave the default for the Expansion Factor field. It controls the automatic expansion of the table when it becomes too full.
Leave the Lower Density and Upper Density fields blank because they apply only to Hash tables.
The last three fields are calculated from the values entered on the tablesONLINE EDIT VIEW screen (see Figure 230) so they are not to change.
See Chapter 4 for an explanation of each of these values.
After filling in the fields on this screen either by entering values or by leaving the defaults, press <Enter> to process the definition. Press <PF3> (END) to return to the tablesONLINE DEFINE TABLE screen (see Figure 223), select Option 4 – BROWSE TABLE DEFINITION and press <Enter>.
The tablesONLINE BROWSE TABLE DEFINITION screen appears, as illustrated in Figure 227.
Browse Table Definition
The table definition can be viewed but the rows cannot be not edited on the tablesONLINE BROWSE TABLE DEFINITION screen (see Figure 227).
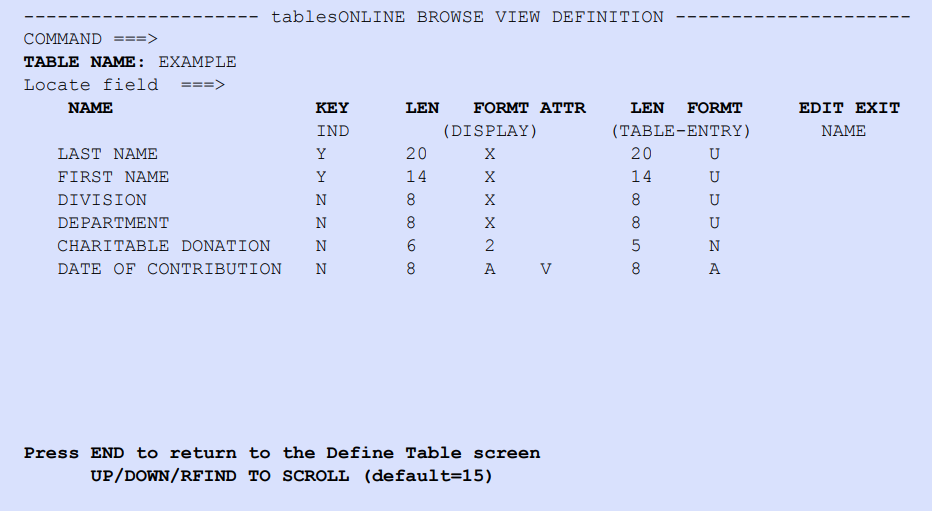
Browse the row layout of the table and then press <PF3> (END) to return to the tablesONLINE DEFINE TABLE screen (see Figure 223). Options 6 and 7 of the tablesONLINE DEFINE TABLE screen will not be selected because the table will be deleted. Instead, press <PF3> (END) to exit the tablesONLINE DEFINE TABLE screen.
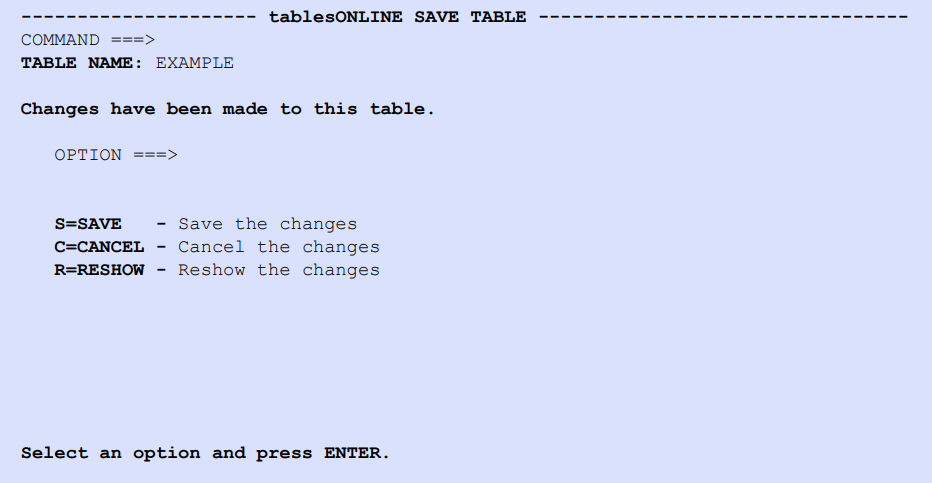
Save EXAMPLE
There are three options at this screen:
- delete the changes
- save the changes
- return to the tablesONLINE DEFINE TABLE screen (see Figure 223)
Choose S to save the table and press <Enter>.
tablesONLINE checks the definition for errors. It finds none and the definition is saved. A message in the top right corner of the tablesONLINE IDENTIFY TABLE screen (see Figure 222) states the table was saved.
Add a Row to EXAMPLE
The supervisor requests that the sex of each employee be added to the table. To include the new information, the View will be updated by adding a new row to accommodate this request. Select Option 1 – EDIT VIEW on the tablesONLINE DEFINE TABLE screen (see Figure 223) and press <Enter>.
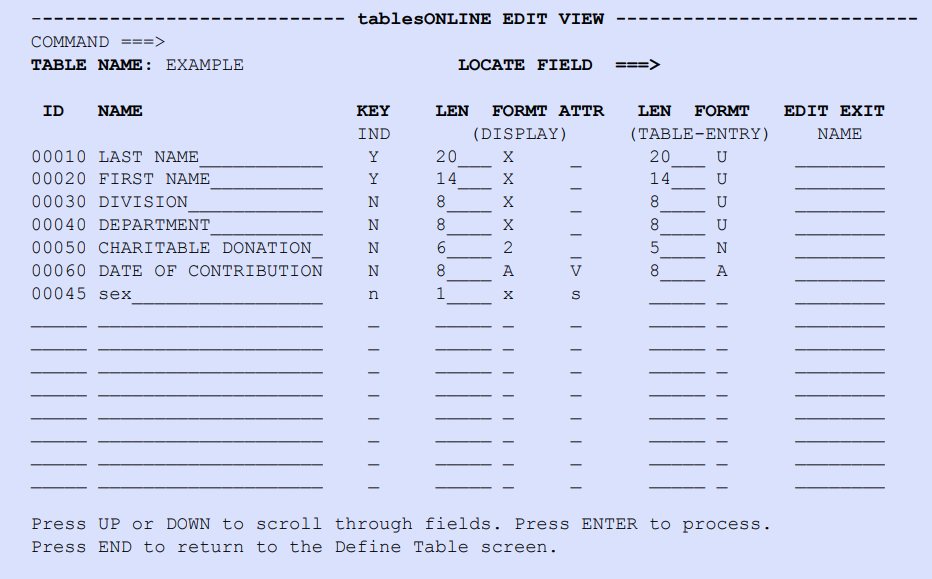
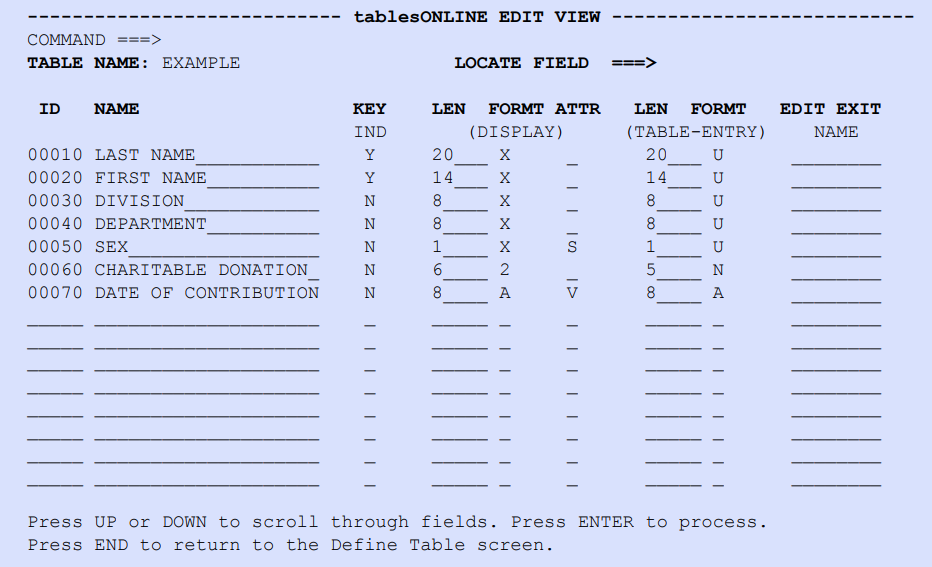
Add a field named Sex to the bottom of the Name column. Specify that it is not part of the key and that it is one-character in length.
Because the Sex field should always contain an alphabetic value, specify X (alphanumeric) in the Format (Display) field.
Then type 45 in the ID column. The S in the Attribute (Display) will suppress this field on the tablesONLINE SELECT ROW BY KEY screen (see Figure 236).
Press <Enter> to process the new addition.
Press <PF3> (END) to return to the tablesONLINE DEFINE TABLE screen (see Figure 223).
Choose Option 3 – EDIT TABLE DEFINITION to process the change in row size. The tablesONLINE EDIT TABLE DEFINITION screen appears (see Figure 226). A message displays stating that the row size has changed. To process changes, press <Enter>, and the message disappears.
Save Changes to EXAMPLE
Press <PF3> twice to return to the tablesONLINE IDENTIFY TABLE screen (see Figure 222). Because the table has been modified with the addition of the Sex field, the tablesONLINE SAVE TABLE screen appears (see Figure 229).
Choose S to save your changes and press <Enter>. The tablesONLINE DEFINE TABLE screen appears (see Figure 223) with the message TABLE SAVED in the top right corner, confirming that the table was updated and the changes were saved. Press <PF3> (END) to return to the tablesONLINE PRIMARY MENU (see Figure 221).
Now that the table format has been defined, it is time to enter data.
Type the name of the table and the name of the library in the appropriate fields of this screen. The Special View Name field is left blank because the View is not a special View.
Because a password for this table has not been specified, the Password field also left blank.
Leave the default for the Generation field.
This screen appears with the names of the key fields. The first row is completed by typing the first and last name of an employee. These are the key fields of the table.
Enter Data into EXAMPLE
The tablesONLINE EDIT ROW screen (see Figure 234) lists the field names on the left, with an area for data entry to the right of each. The value for each field cannot be longer than the number of characters specified for it. Type data for one field, and then tab to the next field.
Press <Enter> to process the data when data entry is complete in all fields.
If the invocation of a user exit program had been specified, it would be called now. tablesONLINE checks that all data adheres to the restrictions that had been specified during table definition.
An error is encountered if there is a discrepancy between how data was defined, and how the data was entered. For example, if an alphabetic character is typed in a field that can only contain numeric values because of its field-definition table specification, an error message is displayed stating that there is invalid data. Invalid data requires correction before the row is processed.
tablesONLINE, however, encounters no errors during its validation of this exercise. The message ROW ADDED appears in the top right corner of the screen indicating that the row was processed. The row is saved and the tablesONLINE IDENTIFY ROW screen appears, as illustrated in Figure 233.
Add Another Row to EXAMPLE
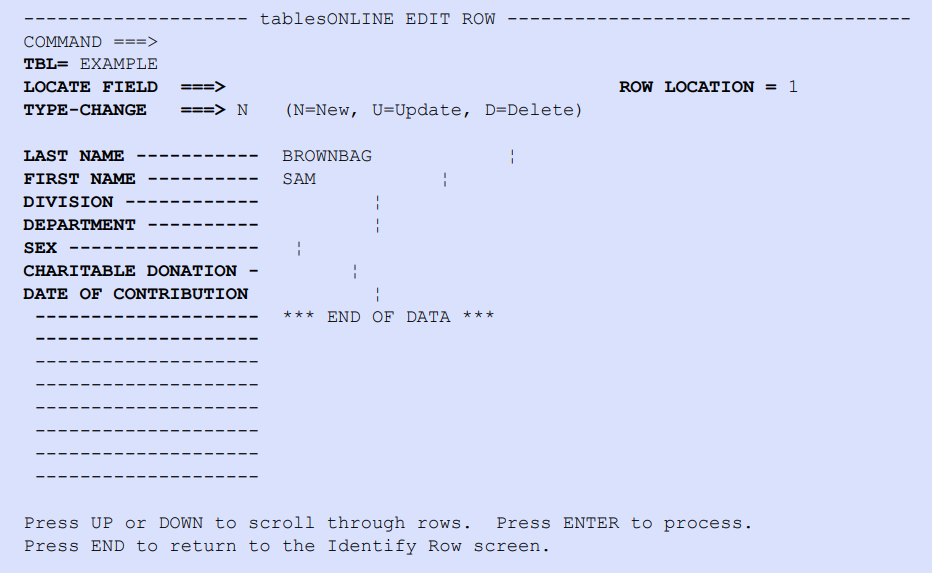
The tablesONLINE EDIT ROW screen (see Figure 235) appears with the values that had been entered for the previous row.
Change the Type-Change field from U (Update) to N (New) so that a new row can be created by using the old row as a base. This is an efficient method of populating tables because it avoids the need to re-enter data that does not change.
After information for the row has been specified, press <Enter> to return to the tablesONLINE IDENTIFY ROW screen (see Figure 233) where the key-field values for the next row to be processed are specified. Repeat this process until all the rows have been added.
Instead of pressing <Enter> which returns to the tablesONLINE IDENTIFY ROW screen (see Figure 233), the GETCOUNT PF key may be pressed to process the current row and present the next row to be added or updated on the tablesONLINE EDIT ROW screen (see Figure 235).
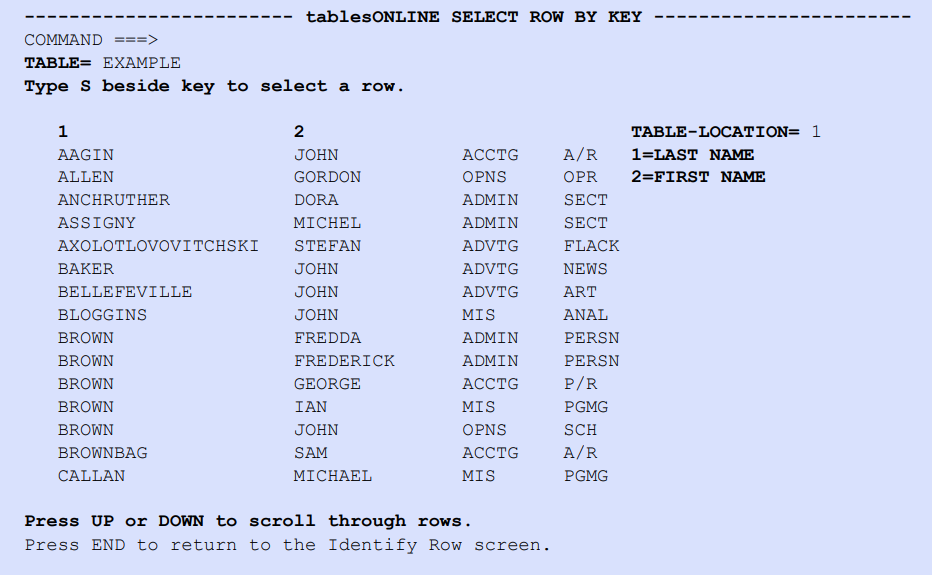
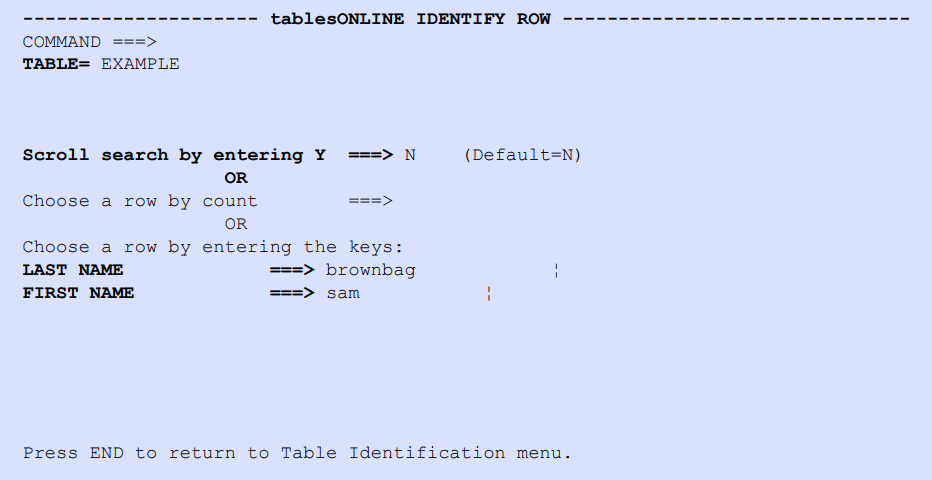
The Table-Location field identifies the table position of the first row shown on the screen. In this case, it is the first row. The key fields are listed under this field. The two left-hand columns display the key values of the rows in the EXAMPLE table.
If a table has more than 15 rows, they are scrolled using <PF7> (UP) and <PF8> (DOWN).
Update a Row in EXAMPLE
Sam Brownbag, one of ABC’s employees, has increased his donation. To process this change, select the row with his employee information by typing an S beside the row and pressing <Enter>.
The tablesONLINE EDIT ROW screen (see Figure 235) appears containing Sam’s information.
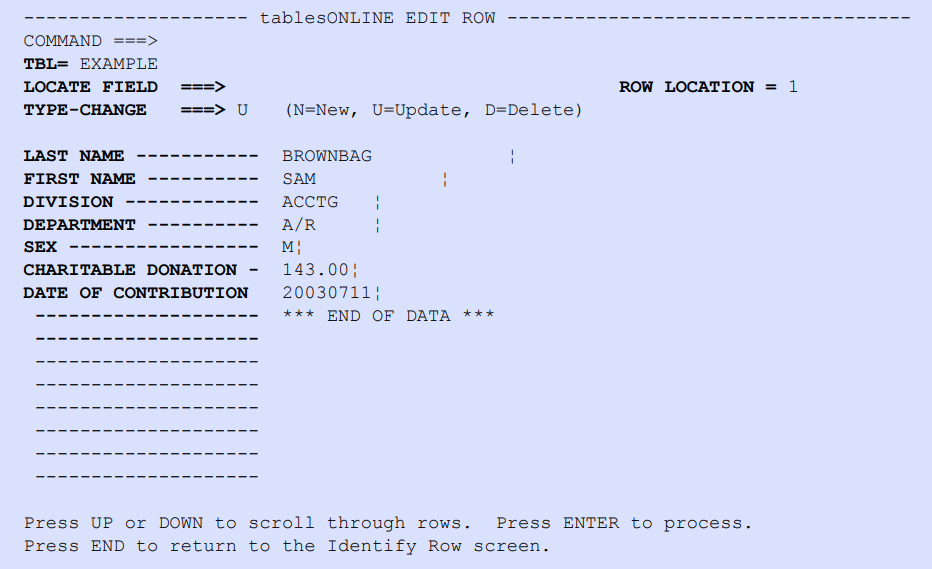
An attempt to change his donation amount from $143.00 to $243.00 is made, however a typographical error occurs. When <Enter> is pressed to process the updated row, an error message appears. The invalid format is corrected, and <Enter> is pressed to process. No error message appears this time. Press <PF3> (END) until the tablesONLINE SAVE TABLE screen appears (see Figure 229).
Choose S and press <Enter> to save the table change of Sam Brownbag’s charitable donation amount.
Press <PF3> to return to the tablesONLINE PRIMARY MENU (see Figure 221) and select Option 1 – BROWSE TABLE, to see the EXAMPLE table.
Browse EXAMPLE
The tablesONLINE BROWSE TABLE screen appears (see Figure 237) displaying the name of the last table that was manipulated. Press <Enter> as this is the correct table to browse.
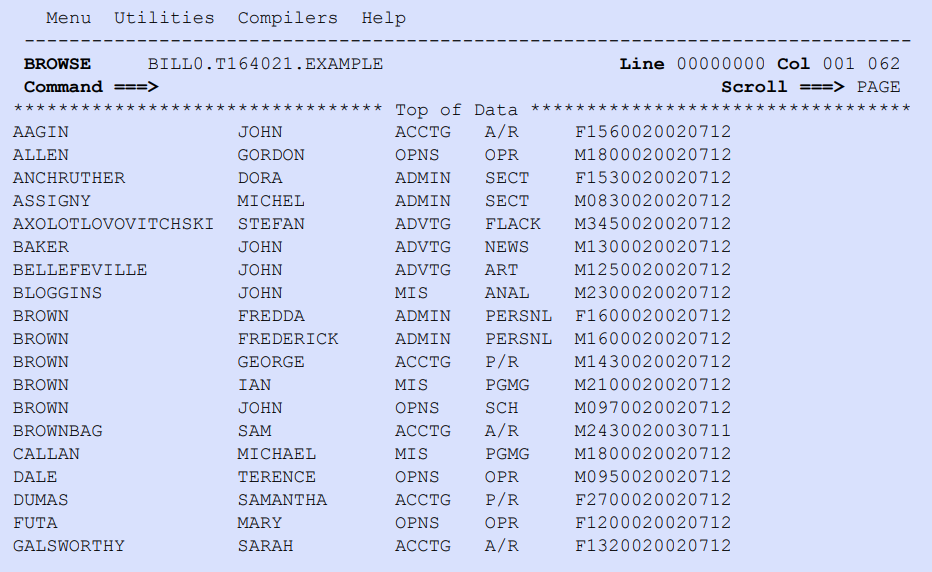
The field names do not appear on this screen because only the data in the table is loaded to a dataset to be browsed with the ISPF browser. UP, DOWN, RIGHT, and LEFT keys are used to scroll through the screen.
The ISPF HEX ON command can be used to see the hexadecimal values of the rows.
Change EXAMPLE Field Definition
While you are browsing the table, the supervisor requests a list of names of the employees in each department. This request requires that the table be reorganized by changing the field definition.
To reorder your table, change the keys from employee names to the Department and Division of each employee by changing the values in the Key Indicator field.
Specify Y for the Division and Department fields and N for the Last Name and First Name fields.
Press <Enter> to process your changes.
Now the table definition has to be updated to match the new row definition. Press <PF3> (END) to return to the tablesONLINE DEFINE TABLE screen (see Figure 223) and select Option 3 – EDIT TABLE DEFINITION to redefine the table definition.
The changes made to the row definition do not need to be reflected here, therefore no values need to be changed. tablesONLINE has changed the Key Location and Key Size fields on your behalf.
Press <Enter> to process the new changes, then <PF3> (END) to access the tablesONLINE IDENTIFY TABLE screen (see Figure 222). A message in the top right corner states that the table was updated. The EXAMPLE table is now ordered by employee division and department, not by employee first name and last name.
Save EXAMPLE and Browse Changes
The tablesONLINE SAVE TABLE DEFINITION screen (see Figure 229) appears because the table was changed. Choose S (Save) and press <Enter>.
Return to the tablesONLINE IDENTIFY TABLE screen (see Figure 242). Press <PF3> (END) to access the tablesONLINE PRIMARY MENU (see Figure 221) where Option 1 – BROWSE TABLE was originally selected. Press <Enter> on the tablesONLINE BROWSE TABLE screen (see Figure 237) and the tablesONLINE IDENTIFY TABLE screen appears (see Figure 242).
The order of the rows has changed. The employees are now ordered by department and by division, not by name.
Since EXAMPLE is a quick reference to find out which employees are in each department, and, to determine which employees have contributed the most to charity, the same data is required in two different organizations.
One option is to reorganize EXAMPLE each time it is accessed, on a per-request basis. The other option is to create an Alternate Index definition for the table.
Define Alternate Parameters
It is necessary to create a table that is organized so that it shows the Charitable Contribution and Date of Contribution for each employee. Name this table EXAMALT.
The tablesONLINE IDENTIFY TABLE screen illustrated in Figure 242 of the Define Table option is used to identify the Alternate Index name.
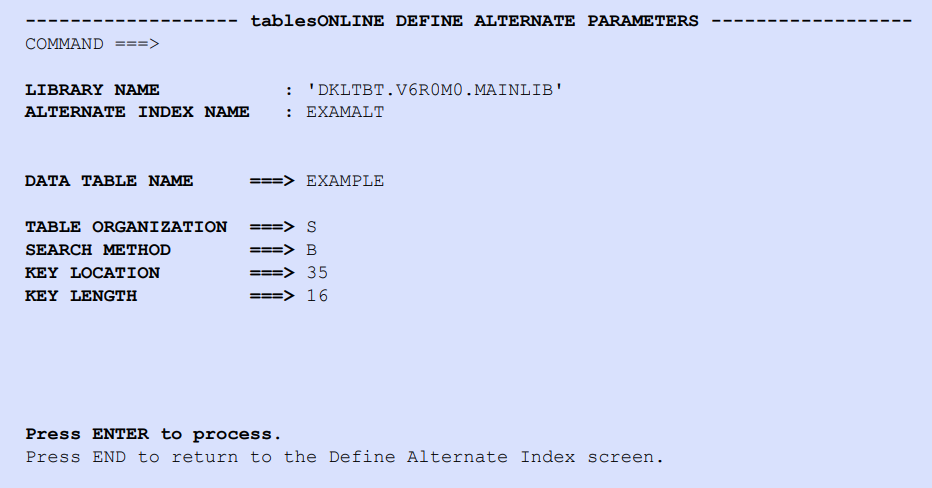
Type in the values for the Library Name and Alternate Index Name fields. Specify the name of the data table, which is EXAMPLE. Enter values for the other fields.
After an Alternate Index is defined, its associated View needs to be defined.
Rather than create a new View, it is easier to copy the View for the table EXAMPLE and then modify it.
Press <PF3> END to access the tablesONLINE PRIMARY MENU (see Figure 221) and select Option 5 – UTILITIES. The tablesONLINE UTILITY screen appears (see Figure 200).
Select Option G – VIEW UTILITIES and the tablesONLINE VIEW UTILITIES menu appears (see Figure 214).
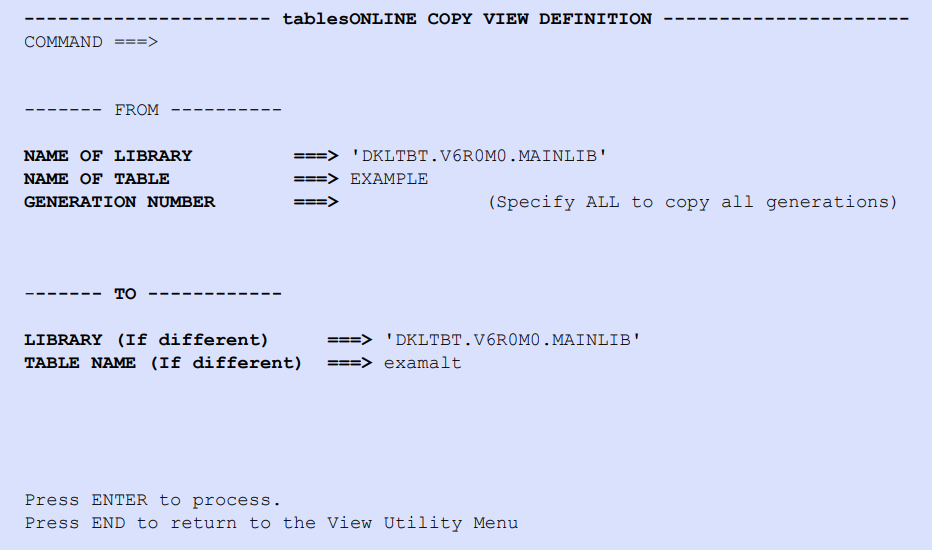
In the Name of Library field, type the name of the library that contains the data table.
In the Name of Table field, type the name of the data table, EXAMPLE.
Leave the Generation Number field blank which implies that the current generation is used as the default generation.
Leave the Library (If Different) field blank because the Alternate Index is being stored in the same library as the data table. Type the name of the Alternate Index, EXAMALT, in the Table Name (If Different) field.
Press <Enter> to process this screen. A message appears stating that the copy was successful.
Edit EXAMALT to Show Alternate Index
The next step is to edit the View called EXAMALT so that it shows an Alternate Index of the table.
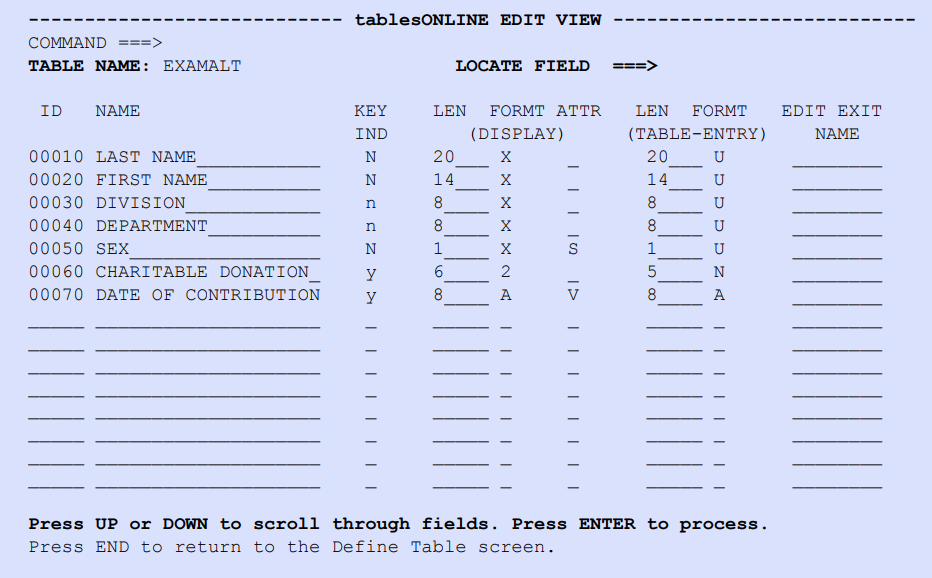
To order the table so that the supervisor can determine who gets a calculator this month, change the values in the Key Ind field so that Charitable Donation and Date of Contribution are the new keys.
Press <Enter> to process the new definition.
Press <PF3> (END) to return to the tablesONLINE Define Table screen, and choose Option 4 – BROWSE TABLE DEFINITION to see the new definition created.
The X in the Storage Mode Code field indicates that this table is an Alternate Index. To exit this screen, press <PF3> (END).
Press END to return to the tablesONLINE DEFINE TABLE screen (see Figure 223). A message appears stating that the View was updated.
After pressing <PF3> (END), the tablesONLINE SAVE TABLE screen appears (see Figure 229). Choose S to save the table. Now that an Alternate Index of the table has been created, it can be viewed like a regular table.
Choose Option 1 – BROWSE TABLE to see the Alternate Index.